How to Add Swipe Animations to a CardView in an Android App

Hi there, I am Gourav, a 17 years old passionate Android developer with interests in Java, C++, python and much more.
Originally published at freecodecamp.org by me. Reproduced here for record.
If you're building an Android app, you should consider adding animations. They can improve your app's user experience and increase retention.
These days, if you see an app that has no animation, it can feel odd and out-dated. And since interactive experiences are kind of the new norm, you'll want to figure out ways to set your app apart.
What We'll Build Here
Now, it might seem difficult to make your app stand out if you just have something basic like a quote sharing app (which is what we are going to work on here). It can be hard to hook the user and keep them interested.
Of course, you could just add two simple buttons to load the next/previous quote and call it a day. But that's pretty basic and any app could do that! Even if you're just building a simple side-project, there's no trade-off for good UX :)
So what we'll do in this tutorial is drop the buttons, and instead have logic where a user can swipe the card to the left. When they've swiped far enough, the app will load a new card with a new quote.
By the end of this post, you will learn how to make a really smooth animated card which a user can swipe that can perform whatever action you choose. Here's a demo of how it works:
Amazing, right? Let's get into it!
Prerequisites
For this tutorial, we will use Kotlin as the programming language for our app – but you can easily translate the code to Java and it would work the same.
For reference, this is the quote card that we wish to enable the swipe feature on.
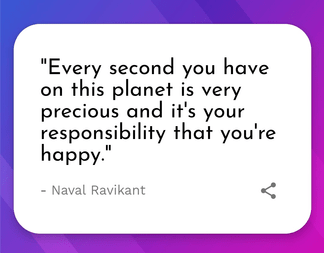
It is an androidX CardView with a bunch of TextViews and an ImageView. There's also a ProgressBar that gets shown while loading a new quote.
We won't be making the XML code for the user interface. You can get the layout I used here from the GitHub repository, or build your own.
Here's the complete code for our Quotes app, if you wish to check it out. It uses the MVVM design pattern, but this article doesn't rely on what pattern you use for the business logic of your app, as we'll just be working on the UI part.
Now, we're ready to make that awesome swipe interface!
How to Handle Swipes in Our App
To handle swipes, we first need to set a touch listener on the card. Each time an action is performed on the card, the touch listener is called. Within the listener, we will add the logic to do the math and perform the animations.
Here is the blueprint of the touch listener we will be using:
quoteCard.setOnTouchListener(
    View.OnTouchListener { view, event ->
        when (event.action) {
            MotionEvent.ACTION_MOVE -> {
                // TODO: Handle ACTION_MOVE
            }
            MotionEvent.ACTION_UP -> {
                // TODO: Handle ACTION_UP
            }
        }

        // required to by-pass lint warning
        view.performClick()
        return@OnTouchListener true
    }
)
Here, we are specifically listening for 2 actions on the card – the ACTION_MOVE and the ACTION_UP.
- The
ACTION_MOVEevent is called when a user starts swiping the card, that is, moving it. - The
ACTION_UPis called when a user lifts their finger from the card, basically, when they release it.
There are many other action events that we can override, such as ACTION_DOWN that's called when a person gets hold of the view, but we don't need them for this feature.
The basic setup for the card is done, so let's figure out the swiping logic.
The math behind the swipe action
First, let's re-think what we want to achieve. Implementing functionality is easier when you know exactly what you wish to have. Your code will also make more sense when your requirements are clear.
Here, we have a quote card. We want users to be able to swipe it only to the left, and if the minimum threshold to load a new quote is reached, it should move back to its original position and load a new quote.
Now, to achieve this, let's think of it in terms of the card. Let's define the mean position as the center of the card.
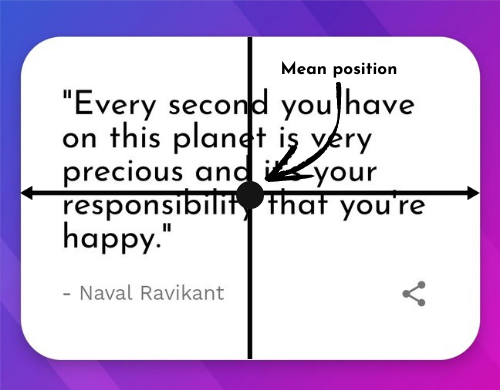
We want the card to swipe if and only if the user swipes it to the left of the mean position.
So how can we make this happen?
You guessed it – we will calculate the mean position and on the ACTION_MOVE event, we will check if the user swiped to the left and move the card accordingly.
How to implement the swipe logic
To implement the logic, we first need to have the starting position of the card, which is fairly easy to calculate. We will just make sure that it is calculated with respect to the full-screen width, not just the card's width.
Place these lines of code before the when(event.action) statement:
quoteCard.setOnTouchListener(
    View.OnTouchListener { view, event ->

        // variables to store current configuration of quote card.
        val displayMetrics = resources.displayMetrics
        val cardWidth = quoteCard.width
        val cardStart = (displayMetrics.widthPixels.toFloat() / 2) - (cardWidth / 2)

        when (event.action) {
            ...
        }
        ...
    }
)
First we get the displayMetrics from resources, which will give us the width of the screen using displayMetrics.widthPixels.toFloat().
Then we get the cardWidth using the width property of the quoteCard.
Finally, we calculate the starting position of the card using the formula (width of screen/2) - (cardWidth/2). Essentially, this gives us the x-coordinate of this position of the card:
Now, let's implement the code for the ACTION_MOVE event.
How to handle the ACTION_MOVE event
Inside the ACTION_MOVE block, we first initialise the newX variable that holds the new x-coordinate that the card has been swiped to.
val newX = event.rawX
event.rawX gives us the absolute value of the new coordinate with respect to the screen width.
newX will contain the x-coordinate where the user's finger is, at any given moment. The value 0.0 for newX means that the user swiped to the left-most part of the screen. And for my emulator, 1080.0 represents the right-most edge of the screen.
Since, we want the card to swipe only if newX is less than the mean position of the card, we will place an if-condition here to verify that this is the case.
Think of this with simple values. Let's suppose that the mean position of the card is at x-coordinate 540.0 (small x-coordinate) and the user swipes to 710.0 (bigger x-coordinate). But we don't want them to be able to swipe to the right. And if the user swipes to 320.0 (smaller x-coordinate), then we need to carry out the swipe and move the card to the new position.
Here's the code to implement the above logic:
if (newX - cardWidth < cardStart) { // or newX < cardStart + cardWidth
    quoteCard.animate().x(
        min(cardStart, newX - (cardWidth / 2))
    )
    .setDuration(0)
    .start()
}
We subtract cardWidth from newX because newX is an absolute value which is not relative to the card. It has a higher value because cardStart is towards the start of the screen, and newX is initially somewhere in the middle (a user would generally swipe from the middle).
We want to compare the value of shift in the x-coordinate and median to the value of cardStart, not the value of newX, so we take this into account by subtracting cardWidth.
Then, we carry out the animation using quoteCard.animate() and we change its x coordinate using the x() function.
Now, why do we do min(cardStart, newX - (cardWidth/2))?
This is very interesting and intuitive to understand. From the beginning, we are emphasizing that the card should move only to the left and not to the right.
newX - (cardWidth/2)) is nothing but the swiped distance towards the left (so subtraction is involved – for the right side, it should be added).
The min() function here returns the minimum of the two values provided. If the swiped distance is less than the cardStart, it is returned, otherwise cardStart is used. This is the condition we want to meet and min() makes it really easy to handle.
setDuration(0) ensures that the animation is carried instantaneously (which keeps swiping from feeling laggy). start() actually starts the animation with the given properties.
This animation will clear any doubt your have on how this works:
(I don't have expertise on making animations, this was the best I could come up with.)
Here is the final code for the ACTION_MOVE event:
MotionEvent.ACTION_MOVE -> {
    // get the new coordinate of the event on X-axis
    val newX = event.rawX

    // carry out swipe only if newX - cardWidth < cardStart, that is
    // the card is swiped to the left side, not to the right
    if (newX - cardWidth < cardStart) {
        quoteCard.animate()
            .x(
                min(cardStart, newX - (cardWidth / 2))
            )
        .setDuration(0)
        .start()
    }
}
You can also include a TextView to the UI that reflects when the user should release the card. Place this code inside the above if statement too:
if (quoteCard.x < MIN_SWIPE_DISTANCE) textView.text = getString(R.string.releaseCard)
else textView.text = getString(R.string.infoText)
where MIN_SWIPE_DISTANCE is -250:
// -250 produces best result, feel free to change to your liking
const val MIN_SWIPE_DISTANCE = -250 // User should move alteast -250 from mean position to load new quote
Now, the ACTION_MOVE event is handled properly. Let's write the code to handle the ACTION_UP event, that is, when the card is released.
How to handle the ACTION_UP event
For the ACTION_UP event, we want the card to come back to its original position, wait for about 100 milliseconds, then load a new quote.
The logic to animate the card is similar, but this time we will make its animation duration about 150 millisecond to make it look smooth.
First, create a variable currentX that holds the current value of the x coordinate of the quote card. We'll use this variable later.
var currentX = quoteCard.x
Then, start the animation on the card. Pass the cardStart variable to the x() function to make it return to its original position and set the duration to 150.
quoteCard.animate()
    .x(cardStart)
    .setDuration(150)
// continued below
This time, we set a listener on the animation. A listener is something that keeps an eye on the animation. By using it, we can perform actions on various animation events such as start, end, resume, and more.
// continuation
.setListener(
    object : AnimatorListenerAdapter() {
        override fun onAnimationEnd(animation: Animator) {
            viewLifecycleOwner.lifecycleScope.launch(Dispatchers.Default) {
                delay(100)
                // check if the swipe distance was more than
                // minimum swipe required to load a new quote
                if (currentX < MIN_SWIPE_DISTANCE) {
                    // Add logic to load a new quote if swiped adequately
                    viewModel.getRandomQuote()
                    currentX = 0f
                }
            }
        }
    }
)
.start()
We set a listener to look for the ending of the animation by overriding the onAnimationEnd() function.
As soon as the animation ends, we launch a coroutine (similar to Threads in Java but much more efficient) with a delay of 100 milliseconds. It then checks if the user had swiped further than the MIN_SWIPE_DISTANCE needed to load a new quote. The variable currentX is used for the comparison here.
If the user actually swipes passing the minimum distance, the coroutine is delayed for 100 milliseconds. Then the view model loads a new random quote from the API, also resetting the currentX variable to 0f.
The final code for the ACTION_UP event looks like this:
MotionEvent.ACTION_UP -> {
    var currentX = quoteCard.x
    quoteCard.animate()
        .x(cardStart)
        .setDuration(150)
        .setListener(object : AnimatorListenerAdapter() {
            override fun onAnimationEnd(animation: Animator) {
                viewLifecycleOwner.lifecycleScope.launch(Dispatchers.Default) {
                    delay(100)
                    // check if the swipe distance was more than
                    // minimum swipe required to load a new quote
                    if (currentX < MIN_SWIPE_DISTANCE) {
                        // Add logic to load a new quote if swiped adequately
                        viewModel.getRandomQuote()
                        currentX = 0f
                    }
                }
            }
        })
        .start()
    textView.text = getString(R.string.infoText)
}
Final Code
This is the final code for the complete onTouchListener():
quoteCard.setOnTouchListener(
    View.OnTouchListener { v, event ->

        // variables to store current configuration of quote card.
        val displayMetrics = resources.displayMetrics
        val cardWidth = quoteCard.width
        val cardStart = (displayMetrics.widthPixels.toFloat() / 2) - (cardWidth / 2)

        when (event.action) {
            MotionEvent.ACTION_UP -> {
                var currentX = quoteCard.x
                quoteCard.animate()
                    .x(cardStart)
                    .setDuration(150)
                    .setListener(
                        object : AnimatorListenerAdapter() {
                            override fun onAnimationEnd(animation: Animator) {
                                viewLifecycleOwner.lifecycleScope.launch(Dispatchers.Default) {
                                    delay(100)

                                    // check if the swipe distance was more than
                                    // minimum swipe required to load a new quote
                                    if (currentX < MIN_SWIPE_DISTANCE) {
                                        // Add logic to load a new quote if swiped adequately
                                        viewModel.getRandomQuote()
                                        currentX = 0f
                                    }
                                }
                            }
                        }
                    )
                    .start()
                textView.text = getString(R.string.infoText)
            }
            MotionEvent.ACTION_MOVE -> {
                // get the new co-ordinate of X-axis
                val newX = event.rawX

                // carry out swipe only if newX < cardStart, that is,
                // the card is swiped to the left side, not to the right
                if (newX - cardWidth < cardStart) {
                    quoteCard.animate()
                        .x(
                            min(cardStart, newX - (cardWidth / 2))
                        )
                        .setDuration(0)
                        .start()
                    if (quoteCard.x < MIN_SWIPE_DISTANCE)
                        textView.text = getString(R.string.releaseCard)
                    else textView.text = getString(R.string.infoText)
                }
            }
        }

        // required to by-pass lint warning
        v.performClick()
        return@OnTouchListener true
    }
}
Congrats! In this tutorial, we've implemented animation that lets a user swipe a card containing a quote to get a new quote.
Don't forget to download the app and test it out yourself. Stars and contributions on the GitHub repository are welcomed!
Conclusion
Now you have learned how to animate a card and handle animation listeners on it. This helps create better UX that makes your app stand out.
Using the knowledge you gained in this post, you can now create most of the following animations for views in Android:
- Programmatically create sliding animations for Android views.
Just as we did in this tutorial.
- Left to right animation
This is fairly simple, just turn the subtraction in the variables to addition and < signs in the if statements to > signs. With these few tweaks here and there, the right to left animations in card view can be turned into left to right ones!
- You can also show and hide views using animations.
For this, you have to keep track of the start position and end position then animate them with alpha() from 0 to 1. For an example, you can refer to my library Accolib to create animated FAQ accordions.
- Basic animated layout changes can be achieved with view animations.
Thanks a lot for reading so far, I hope this post added some value. Subscribe to my newsletter(at the top of the article) to stay updated with latest Android content!


